Showing posts with label knitting. Show all posts

Friday, November 30, 2012

Bumble Bee: A Free Knitting Pattern


For some reason, knitting for boys always feels difficult to me.  My boys aren't into sports teams and little boys don't seem to care much about the craftsmanship in lovely cabled hats.  They want pictures of their favorite things. They want snips and snails. If only I loved doing intarsia, so they could have all the things!

I set out on this hat pattern with the plan of making it reminiscent enough of a bumble bee for my son's approval, but also cozy and warm enough to satisfy my tastes.  For toddlers I strongly prefer earflap hats with ties so that it stays put and keeps little ears warm.  I also included instructions for just making a typical no-earflap style for both the toddler and kid sizes.  Knitted in a super bulky weight yarn, this hat knits up quickly, just in time for holiday giving.

I have linked to the techniques I used for increases and decreases.


Bumble Bee Hat

Yarn: Lamb's Pride Bulky 1 skein of "wild mustard" colorway and one skein of "onyx".  Keep in mind that this is actually a super bulky weight yarn, if using a substitution.

Needles: 10 1/2 circular needles or size for appropriate gauge.  I use 40 inch and magic loop method, but you could use 16 in and dpns for the top, if you prefer.  TAKE TIME TO CHECK YOUR GAUGE.

Gauge: 15 stitches and 21 rows per 4 inches in circular stockinette
Sizes: Toddler (Child)
(for non-earflap style, skip the instructions for the earflap and start  in appropriate section marked with ***)

Earflaps: Starting with black yarn, CO 5 (for both sizes)
   row 1: K across
   row 2 (and every even row): P across
   row 3: K1, M1L, K to last stitch, M1R, K1 (7 stitches)
   row 5: increase as row 3 (9 stitches)
   row 7: FOR CHILD SIZE ONLY increase once more as row 3, you should now have 11 stitches.  For toddler size, K across.

Continue in stockinette stitch until earflap measures 2 (2 1/2) inches, ending with an even (purl) row.  Cut yarn and place all stitches on a stitch holder.  Work second earflap as first, but DO NOT cut yarn.  Knit back across.  Using knitted cast on, cast on 24(26) stitches, knit across other earflap (from stitch holder), then cast on 14 (16) more.  You should now have 56 (64) stitches.  Join, being careful not to twist, and marking beginning of round.  Knit 1 1/2 inches from front brim.

***  for non-earflap-style hat, start here, if doing earflap hat, ignore the portion between the *:  Cast on 56 (64 stitches) using black yarn, then join, being careful not to twist.  Work k2 p2 rib for until work is 1 1/2 in long.**

Switch to yellow yarn.  You will be working three (four) yellow stripes (and  consequently two (three) black stripes).  Each needs to be 3 rounds wide.  Please keep in mind color changes every three rounds while working the next steps.  I should have used a jog-less jog but didn't.  You can see where the change-over is on the hat.  I'm pleased with it anyway (and so is my son... though ecstatic might be more accurate for how he feels about it) but you may prefer to use one.  After last yellow stripe, remember to cut the yarn so you can weave it in.

Work until hat is 4 1/2 (4 3/4) inches from the front brim.  Work one round.

Next rnd: *K5(6), K2tog.  Repeat from * around (48(56) stitches remain)
K next two rounds.
Next rnd: *K4(5), K2tog.  Repeat from * around (40(48) stitches)
K next two rounds.
Next round: *K3(4), K2tog.  Repeat from * around (32(40) stitches)
K one round
Next round: *K2(3), K2tog.  Repeat from * around (24(32) stitches)
K one round
Next round *K1(2), K2tog. Repeat from * around (16(24) stitches)

CHILD SIZE ONLY: knit one round then next round *K1, K2tog repeat from * around (16 stitches) t

Stinger:

Both sizes should now have 16 stitches.  The rest of the instructions for the hat are the same for both sizes (except the finishing).

Knit two rounds.

Next round: *K2tog.  Repeat from * around (8 stitches remain)
Knit two more rounds.
Next round: *K2tog.  Repeat from * around (4 stitches remain)
Knit two more rounds, then cut yarn and pull through all stitches.

Finishing: (earflap style only) Pick up 68 (76) stitches spread evenly around entire brim and around earflaps.  Cast off.  Weave in ends.

For ties, I used the twisted cord method:  I took a long length of yarn (I didn't cut it from the skein until I had made the cord), maybe 2 ft or so, and folded it back so it was 4 ft of yarn forming a loop that I would be twisted together.  I didn't do multiple like in the linked video because I didn't want it too thick, especially since the yarn is so thick already.  I twisted the "loop" end while holding tight to the end of the yarn and where it was folded back to until it was twisting up on itself.  Instead of tying off at this point as in the linked video, I used a crochet hook to pull the loop end through the bottom of the earflap, and folded the twisted portion in half and held the loop end and the other end together.  Then I just held it up and let the hat spin until it was well twisted then tied it off.  Repeat on the other side trying to make them the same length.

As an alternative, you could just do a simple braided tie or an i-cord tie. 


Happy knitting!


Monday, December 21, 2009

Oliver's Christmas Spider Hat: a free pattern

I had decided to knit hats and mittens from the luscious Malabrigo Worsted I picked up for 20% off at my local yarn shop during their annual birthday sale. I had finished my daughter's and planned to embroider little flowers on her hat, but couldn't come up with a good (easy/beginner) embellishment for a boy's hat. Friends gave me ideas like stars and rocket ships, sailboats, etc... but I wasn't exactly sure how I'd do that, and I wasn't sure that Oliver would be into it.

Then the concept of bugs came up, and it reminded me that I had seen patterns for bobble spiders out there. I ran across this pattern for Spider Socks using that lovely spider. I realized that considering the hat I was making was on size 9 needles the gauge alone probably won't allow me to put the big spider pattern on a toddler hat, but her teeny spiders were perfect! Sadly, they were written for knitting from the top-down, but my hat was going from the bottom up. So I came up with a slightly different pattern for the spider and spread it over the course of the hat.


Soooo... here's my version of the spider, worked on reverse stockinette:

Worked in multiples of 9 stitches, in the round.

Round 1 & 2: Purl
Round 3, 5, 7, and 9: P1, slip 7 with yarn in front (be careful to leave it loose enough that you can attach it to your spider which will be on round 10, these will form the legs) P1.
Round 4 & 6: Purl
Round 8: P4, K1, P4
Round 10: P4, work bobble [knit in front of loop, knit in back of loop, knit in front of loop, knit in back of loop, knit in front of loop so that there are now 5 stitches in the bobble. Turn project around and purl across the 5 bobble stitches. Turn work and knit the 5 bobble stitches together through back of loop.] take the 4 slipped sections from rounds 3, 5, 7, and 9 and put them BEHIND the bobble, so that the bobble looks like the spider's body and the legs appear to come from it. P across.

Round 11 and as far above as you like: P4, K1, P4

I decided to do my spiders at various heights, to make it more interesting.


Friday, October 2, 2009

Sparkle: Beaded Holiday Placemats (a free knitting pattern)


I've been trying to come up with things to make for family for christmas. I had an idea for some nice placemats that were simple, but still dressed up a little for the holidays. Here's what I came up with:

Yarn: Bernat Handicrafter Cotton Ultrasoft in Imperial Red
Needles: size 6
Gauge: 20 stitches per 4 inches
Beads: use a bead that has a large enough hole to get the beads onto the worsted weight yarn. The beads I used were the large sized glass beeds from beader's paradise (I found them at JoAnn fabrics)

PB (Place Beads): bring yarn to front of work, slide bead as close to last worked stitch as possible, slip next stitch while holding bead in front of it, so that the slipped stitch is behind the bead. Bring yarn back to back of work to begin next stitch.


Pattern for Placemat:

Thread 25 beads onto the yarn (BEFORE CASTING ON!!)
Cast on 80 stitches.
Work 6 rows of seed stitch (K1P1 across for a row, next row K1P1)

Row 1 (right side): work seed stitch in first 5 stitches, Knit to last 5 stitches, work seed stitch in last 5 stitches
Row 2 and every wrong side row: work seed stitch across first 5 stitches, Purl across to last 5 stitches, work seed stitch to end.
Row 3: work seed stitch in pattern for the first 5 stitches, knit 6, PB, knit across to last 5 stitches, work seed stitch to end.
Row 5: same as row 3
Row 7: work seed stitch across first 5 stitches, K3, PB, K2, PB, K2, PB, work across to last 5 stitches, work seed stitch to end.
Row 9: work seed stitch in first 5 stitches, K4, PB, K1, PB, K1, PB, knit across to last 5 stitches, work seed stitch to end.
Row 11: Work seed stitch in first 5 stitches, K5, PB, K1, PB, knit across to last 5 stitches, work seed stitch to end.
Row 13: Work seed stitch in first 5 stitches, K2, [PB, K1] 4 times, PB, knit across to last 5 stitches, work seed stitch to end.
Row 15: work as row 11
Row 17: work as row 9
Row 19: work as row 7
Row 21: work as row 3
Row 23: work as row 3
Row 25: Work seed stitch in first 5 stitches, K across to last 5 stitches, work seed stitch to end.
Continue working as row 25 until work measures 11 inches.
Work 6 rows of seed stitch. Bind off in pattern. Weave in ends.


Measurements: Finished placemat measures 16 inches by 12 inches.


Sunday, September 27, 2009

Swell Snowflake Hat


Well, I promised my sister I'd make her a hat, and even bought the yarn, about a year ago. But, well, she wanted a fair isle hat, and I wasn't overly great at complicated fair isle (the only fair isle I was happy with that I had done was that hat for Oliver, last year), so I decided now was the time to learn how to knit with the other hand... and I did! I think I'm almost as proficient (and actually faster!) with picking, now as I was with throwing. It's a very exciting development in my knitting ability :) Anyway, what they say is true, it *is* a lot easier to do stranded knitting holding one strand in each hand. It came out great, despite my gauge being slightly off - I'm still really happy with it.

Tuesday, March 3, 2009

Revisiting the Sweet Baby Cap

My son has a ginormous head. He's 19 months old, but is wearing 2T-3T hats. Huge. I just measured him and he has a 19 inch head, but the standard head size for a "child" is 18 inches. I love that sweet baby cap and I want to do it again, but in the appropriate size for him. I'm calling it 3T, but it could be considered "child" size, I think. So, doing the math, I came up with 139 for the cast on. That's also adjusted for having all the sections be even length... because I'm a dork like that.

So, here's my final pattern (I think) mostly taken from the original but just with the tweaking described above:

Gauge: 24 stitches = 4 inches

Needles: Size 2 & 3 circular needles

Yarn: JoAnn Sensations Kashmira

Sizes: 3T / Child

CO 139 stitches with size 2 circular needle, join then knit 7 rounds in garter stitch (purl one round, then knit one round) then change to 3 mm needles and knit the rest in stockinette stitch, changing colors as you see fit.

At the same time:

On the next round, increase and decrease as follows:
k1, M1, k21, slip 1 - knit 2 tog tbl - ­ psso, k 21, M1, k1, M1
k 21, slip 1 - knit 2 tog tbl - psso, k 21, M1, k1, M1, k 21, slip 1 - knit 2 tog tbl - psso, k 21, M1, k1

Repeat these increases and decreases every other round for 11, or 12 or 13 (depends on the size you want - an older kid will need more length in the hat) more rounds. Then do only the decreases every other round until there are 10 stitches left. Then k2tog until only one stitch is left, break yarn and thread through remaining stitches.

I like to attach twisted cord to the ear flaps. You can do i-cord or crocheted cord, too, if you prefer.

Wednesday, September 17, 2008

Trying my hand at fair isle


I finally got around to doing some interesting color work. I found this pattern in Cool Knits For Kids. I couldn't find any errata for the pattern, and the pattern isn't even imputed on ravelry yet, but the pattern seems to be missing a chart, so I did my fair isle stuff mostly from the picture. It worked out, though - looks pretty good, if I do say so myself. I also picked an alternate color scheme (the one in the book is pink) and took out the heart intarsia on the ear flaps and replaced it with a random fair isle pattern. I'm really happy with the result! Now, if I could only get my toddler to wear it!

Monday, January 28, 2008

Fibonacci Hat


Well, since the other hat didn't fit my son's ginormous head, I ended up giving it away and trying again. This time, I used JoAnn Sensations Kashmira yarn (which is DK weight, in case you're wondering, but for some reason it's not labeled). I really like the JoAnn Sensations yarn. I didn't think I was going to like it this much but, for cheap wool, it's REALLY smooth. Not soft, really, so much as soft like cotton might be sorta soft. It doesn't feel scratchy at all like normal wool feels. I tried to felt it before though, since the label says "100% wool Felt-able" but the felting was terrible.

The colors I had I wasn't too sure about, so I had read on some blog someplace that if you use the Fibonacci sequence for the stripes it is more appealing to the eye than just straight stripes w/colors that don't necessarily go well together. I had about the same gauge (as far as I can tell) as with the patons classic marino, so I went with it, but I believe I cast on 113 this time to make up some circumference and also did 9 iterations of the increase part of the pattern. I love how it turned out. I'll see if I can get him to hold still enough to get a pic of him with it on.

Wednesday, January 16, 2008

Baby Hat take 2


Ok, so since they didn't give a gauge (or dimensions), I think the hat I made turned out closer to 0-6 month size. At least, it's tight on my 6 month old, but maybe he has a giant head. here's the pic, though. I guess I'll try a bigger number cast on :)

Sunday, January 13, 2008

Baby Hat

One of my friends did her own rendition of this hat pattern, which I got to see when we were at a playdate. OH SO CUTE!! So of course, I set out to try out my own rendition (she didn't give me the website, I had to search it out). The pattern is translated from a Norwegian pattern, and I don't know about you, but I've never even *seen* a 2.5mm circular needle (I believe that's a 1 1/2 size, US). And of course, I wanted to knit it right away instead of waiting until I got a chance to go to a yarn shop, so I had to go with what I had. I *do* have a size 3 circular needle, which I figured I could use and get a fairly small gauge, and the Patons Classic Wool Merino comfortably knits to a pretty small gauge, so I decided to go with that from my stash. The gauge in the pattern is 28 stitches to 10 cm (about 4 inches), so instead I wound up with 24 stitches per 4 inches with the combo I used. I wanted to make a 12 month size hat, so I calculated out how many inches it would be using their gauge and then used that to decide to cast on109 stitches. That puts the in between straight stockingette sections at 16 stitches instead of 18 or 19.

Ok, I'm off to knit. I'll let you know how it goes!

Wednesday, January 9, 2008

Finished Braidy


I finished it, finally. And just in time to give it away as a christmas present. It turned out well, but I think if I were to do it again, I'd go with the worsted weight and a smaller gauge. probably a 6x1 rib. The chunky yarn was just a bit too thick, I think, but good for a men's scarf. I'm extremely happy with how the cabling turned out, though.

Saturday, December 15, 2007

Braidy


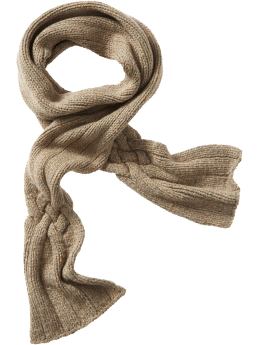
I saw the new Gap Donegal Scarf and decided I LOVE it. But... I don't want to buy it, because to just have it isn't enough, even though it's being sold at a reasonable price for a hand-knit scarf, and in a month or two I could buy it on a lovely deep discount. I want to KNIT it. I want to do it myself. I HAVE TO!! It's a fairly simple pattern, and it shouldn't be much of a problem.

Doesn't it look cool? That's the Gap pic... hope it's ok if I use that. If not, here's the link I'll post mine when it's done.


Here's my pattern for it, I'm calling it Braidy. It won't be exactly the same because I believe they used a worsted weight yarn, and 6x1 rib which you might consider, too, adjusting your cables and needle size according , but....


Braidy
:

Yarn: wool ease "chunky" I used the "charcoal" colorway.

Needles: Size 11 straights (8.0 mm) (or size needed to obtain gauge - or at least be close)

Gauge: 14st =4 inches in 4x1 rib

BTW... please let me know if you use this pattern... I'm curious if anyone will :)

4x1 rib:
Row 1 - p1 *k4, p1 repeat from *
Row 2 - k1 *p4, k1 repeat from *

Cable sequence :
Row 1: p1, k4p1, k4p1 slip next 5 stitches onto cable needle hold to front of work, k4p1, K4P1 from cable needle. work remainder of row in 4x1 rib.
Rows 2 - 6: Work in 4x1 rib starting w/row 2
Row7: p1 k4 p1, *slip next 5 stitches onto cable needle and hold to back of work, K4P1, K4P1 from cable needle. repeat from * once more, K4P1
Rows 8-12: work in 4x1 rib starting w/ row 2
Row 13: p1, *slip next 5 stitches onto cable needle hold to front of work, k4p1, K4P1 from cable needle. repeat from * twice more.
Rows 14-18: work in 4x1 rib starting w/ row 2
Row 19: work as row 7
Rows 20-24: work in 4x1 rib starting w/ row 2
Row 25: work as row 1


Pattern:
CO 31 stitches.
Work 4x1 rib for 12 inches, then work cable sequence.
Work 4x1 rib again for 3 feet (or 36 inches, if you prefer) , then work cable sequence again.
Work 12 inches of 4x1 rib then bind off rib-wise.

I'm only through the first cable sequence right now but I'll post the picture of my finished object when I get a chance. Enjoy!

More pics:
I'd like to add that I checked out the original gap version (which is for women, and a bit daintier than the one I made) and it's definitely made from worsted, but has the same 4x1 rib. If you're making it for a woman, you might prefer to use a worsted weight yarn, although it'll take an extra skein of it, I suspect. You might also make it a bit shorter, depending on how long you like your scarf, but the one I made was intended for a man.

Tuesday, December 4, 2007

Coasters

As one of my ideas for christmas gifts, I've decided to do felted coasters. I used Patons SWS (soy wool stripes) for it. I really liked the lopi-ish style single-ply of the SWS. It's one thing I really liked about Lamb's pride, too. Here's the initial swatch at 9 inches by 7 inches. I cast on 25 stitches on size 10 1/2 needles, then worked it in stockingette. I'm just doing one big long piece to get the rest of the coasters done. Much more efficient, since I'm cutting it anyway.


Here's the swatch after it was felted. It's now 6 inches by 5 inches.

I then used a coaster I have as a guide and cut the felt into square coasters. They're just shy of 4 inches square.
I like it better post cut - the sharp edges look nicer than the messy felted edges of the original swatch, imo. The striping of the yarn turned out really well, too! I'm very happy with the way it turned out... now to do the rest....

Monday, November 19, 2007

My Knitting ADD is at it again....

Yes, I have unfinished projects with a timeline, but.......

I've had the worst sinus headaches of my life the last few days and have been doing my best to treat them sans antibiotics (because I'm not interested in seeing a doctor, honestly), so I've been doing the ol' snort-the-salt-water-up-the-nose treatment that my mom highly recommends. Yes, it's been helping, but not really enough. So, I've also been putting heat packs on my face. Mmmmm... lovely heat making my headache feel better.

So, while under the darkness of the lovely heat pack, I was thinking... I bet I could *make* a lovely felted heat pack. So, that's the plan. I'll post the pattern when I'm done.

Wednesday, November 14, 2007

A Necessary Evil

Yes, that's right... rolling the tangled yarn into a ball.

Why yarn isn't sold in balls, I'll never understand. By the end of the skein I'm almost always rolling it up into a ball to save my sanity. This is by no means my favorite activity, as you may have guessed. In case you've never had the pleasure, it goes like this

Step 1... notice that the yarn keeps tangling up making you stop your knitting/crocheting/whatever you're doing every few stitches in order to loosen up enough yarn for you to make a few more stitches

Step 2... you decide (after much frustration) that you must put down what you are doing and take on the task of rolling the yarn into a ball so that you may continue in peace and sanity

Step 3... Put down your fun project, and pick up giant knot of yarn. It's important to understand, that by giant knot I don't mean one huge knot but a multitude of knots forming a large conglomeration and that it's sneering at you, taunting you to untie it.

Step 4... start dutifully pulling at the end and wrapping the yarn around your fingers, stopping after practically every wrap to wrestle with said multitude of knots.

Step 5... get frustrated and throw the giant knot across the room screaming profanities at said knot.

Step 6... dig out hard liquor from wherever you're storing it and take a swig.

Step 7... kick giant knot hoping you can badger it into submission

Step 8... take another swig of liquor and turn back to carefully wrapping your yarn into a ball

Step 9... throw yarn across the room and encourage your toddler (or cat) to wander off with it, never to be seen again.

Step 10... sober up and drive to the yarn store for a new yarn that it still beautifully organized into a skein.


Ok, so maybe that's not really how it went, but that's about how it feels like it COULD go......

Friday, November 9, 2007

Responsibilities...

Tonight my dad and step-mom are coming for the weekend. I should be cleaning... but I WANT to knit!! Here's what I'm working on now...


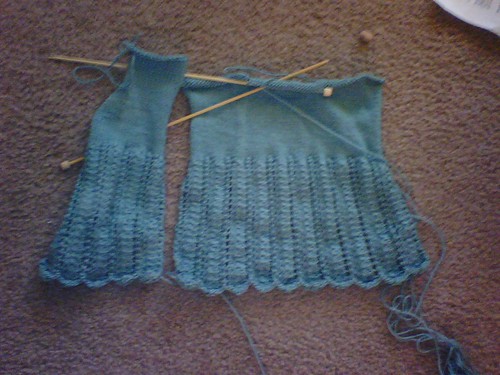
It's the Matinee Coat from Debbie Bliss's "simply baby" That picture is from a while ago, I've finished the other front and am part way up one sleeve.